 Pin It
 My neighbor brought over a strawberry galette one June afternoon, and I watched her pull it from the oven with the kind of casual confidence that only comes from making something a hundred times. The pastry edges were bronzed and crispy, the filling bubbling at the seams, and when she cut into it, the smell of toasted almonds mixed with fresh berries filled the entire kitchen. I was convinced it required some fancy French training until she casually mentioned it took her thirty minutes total. That moment changed how I thought about desserts—sometimes the most impressive things are actually the simplest.
I made this for a picnic last summer, nervous the whole drive to the park that it would fall apart or taste too fancy. A friend bit into her slice and immediately asked for the recipe, then admitted she'd been intimidated by galettes her whole life. Watching her realize how forgiving and fun this dessert actually is made me understand why my neighbor had been so relaxed about it—this galette doesn't punish imperfection, it celebrates it.
Ingredients
- All-purpose flour: Use a reliable brand you trust, and measure by spooning and leveling rather than scooping straight from the bag, which compacts the flour and throws off your ratios.
- Unsalted butter, cold and cubed: This is the secret to a flaky crust—warm butter blends into the flour and creates a dense pastry instead of the tender, shattered layers you want.
- Ice water: Keep it genuinely cold by adding a few ice cubes to your water before measuring, and add it one tablespoon at a time so you don't overdevelop the gluten.
- Almond flour: The frangipane base that separates a good galette from a great one, providing richness and structure that keeps the strawberries from making the crust soggy.
- Fresh strawberries: Choose ones that smell like summer, and don't wash them until you're ready to hull them, as moisture is the enemy of that caramelized fruit flavor.
- Cornstarch: This gentle thickener absorbs the strawberry juices without making the filling gluey or overly stiff.
Tired of Takeout? 🥡
Get 10 meals you can make faster than delivery arrives. Seriously.
One email. No spam. Unsubscribe anytime.
Instructions
- Build your pastry base:
- Combine your flour, sugar, and salt in a bowl, then work in the cold butter using a pastry cutter or your fingertips until everything looks like coarse breadcrumbs with some pea-sized butter pieces still visible. This texture is what creates those crispy, flaky layers when the butter melts in the oven.
- Bring the dough together:
- Add ice water one tablespoon at a time, tossing gently with a fork until the dough just holds together without being wet or sticky. Wrap it in plastic and chill for at least thirty minutes, which lets the gluten relax and makes rolling much easier.
- Create the almond filling:
- Cream together the almond flour, sugar, and softened butter until the mixture is light and pale, then beat in the egg, vanilla, almond extract if using, and salt until you have a smooth, spreadable paste that smells incredible.
- Season your strawberries:
- Toss your sliced strawberries with sugar, cornstarch, and lemon juice and let them sit for a few minutes so the fruit releases just enough juice to create a light syrup without pooling.
- Preheat and prepare:
- Heat your oven to 400°F and line a baking sheet with parchment paper, which prevents sticking and lets the bottom of the pastry brown evenly.
- Roll out the pastry:
- On a lightly floured surface, roll your chilled dough into a twelve-inch circle, rotating it as you go to keep it even and transferring it to the prepared baking sheet before it gets too warm and elastic.
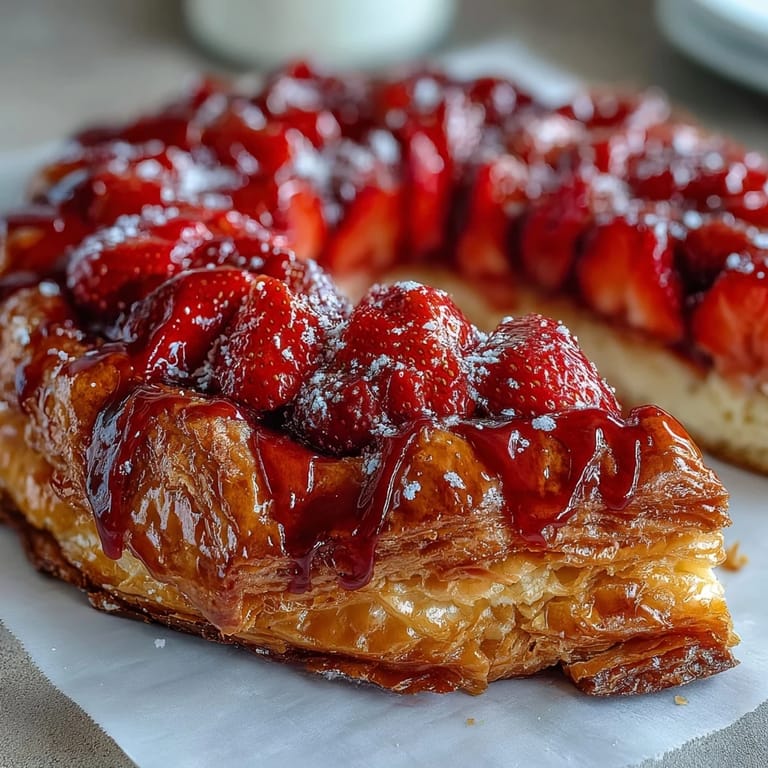
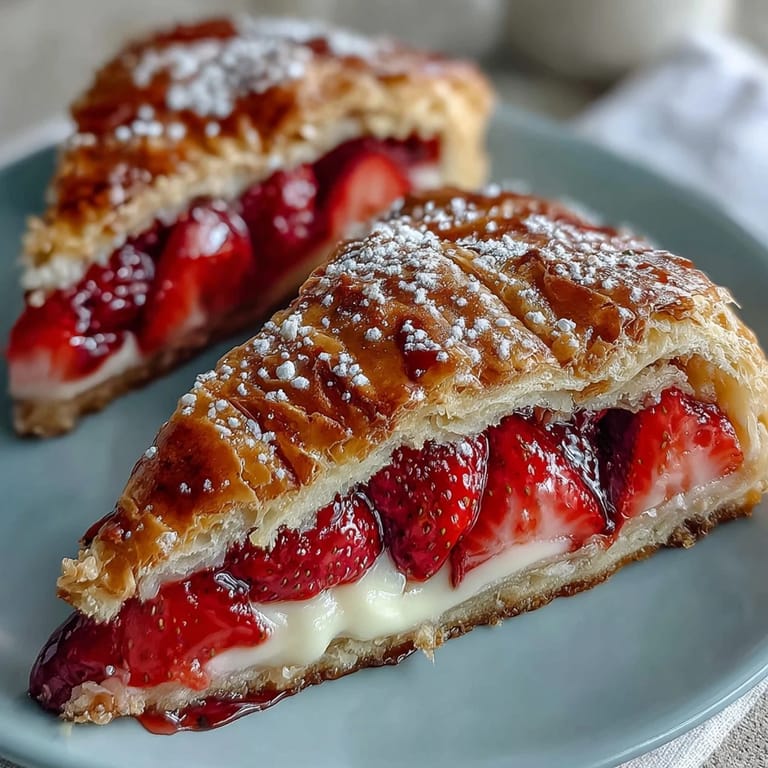
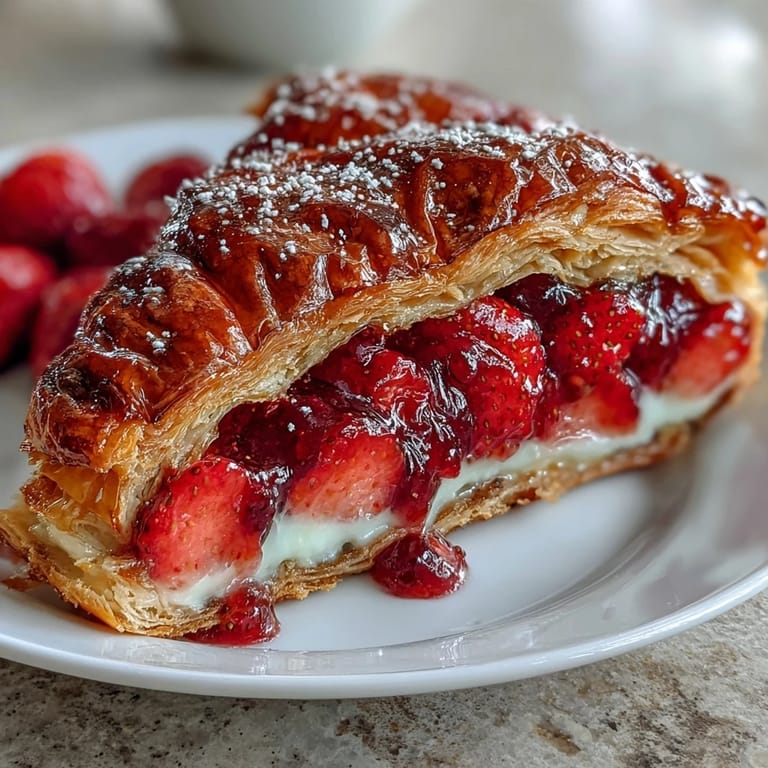
- Layer your fillings:
- Spread the almond frangipane in a circle in the center, leaving a two-inch border, then arrange the strawberries on top so each slice will have both filling and fruit.
- Create rustic edges:
- Fold the pastry border up and over the filling, pleating it loosely as you go around—perfection is the enemy here, and those uneven folds are what make it look authentically rustic.
- Finish and bake:
- Brush the pastry edges with milk or cream and sprinkle with coarse sugar for a beautiful golden crust, then bake for thirty-five to forty minutes until the edges are deep brown and the filling is visibly bubbling.
- Rest before serving:
- Let the galette cool for just a few minutes so the filling sets slightly, making it easier to slice while still maintaining that warm, melted quality.
 Pin It
 Months after that picnic, the same friend made this for her own dinner party and texted me a photo of it golden and perfect on her table. Knowing she'd overcome her galette anxiety made me realize this recipe does something special—it gives people permission to be imperfect and still create something beautiful.
The Magic of Frangipane
The frangipane layer is honestly the part that convinced me galettes were worth making regularly. It's a thin barrier between the juicy strawberries and the pastry, but it does the heavy lifting by absorbing moisture and adding a subtle almond flavor that makes people pause and ask what they're tasting. I learned early on not to skimp on the almond flour quality—cheap versions taste dusty and flat, while a good one brings an almost buttery richness that elevates the entire dessert.
Timing and Temperature Matter
The first galette I made, I got impatient and used room-temperature butter because I forgot to take it out of the pantry. The crust was dense and tough, and I spent the next week reading about pastry technique like I was training for a professional exam. The second time, I was obsessive about cold butter and proper resting, and the difference was shocking—flaky, crispy layers that shattered when you cut into them. Temperature control isn't complicated, it just requires a little forethought and patience.
Serving and Storing Your Galette
This galette is forgiving about timing because it's genuinely good warm, at room temperature, or even cold from the fridge the next morning. I've learned that it actually holds together better after a few hours of cooling, so baking it a few hours before guests arrive takes the stress completely out of the equation. A dollop of whipped cream or vanilla ice cream is optional but transforms it into something that feels like an occasion.
- The galette keeps covered at room temperature for a day, or wrapped in the fridge for up to three days, and honestly tastes fine either way.
- You can make the dough and frangipane the day before and assemble everything the morning of, which turns this into an almost no-stress dessert.
- If you want to get fancy, serve it on a wooden board or parchment paper to keep that rustic, casual vibe that makes people fall in love with it.
 Pin It
 Every time I make this galette, I think about that summer afternoon at the park and how a simple dessert became a shared moment. It's the kind of recipe that deserves to be made over and over again.
Recipe FAQs
- → What makes the pastry crisp and golden?
Cold, cubed unsalted butter is cut into the flour mixture, creating flaky layers that bake into a crisp, golden crust.
- → Can I substitute the almond frangipane?
Yes, for a nut-free variation, you can omit the almond filling and spread a thin layer of your favorite jam instead.
- → How do I keep the strawberries from releasing too much juice?
Toss sliced strawberries with sugar, cornstarch, and lemon juice to help thicken juices during baking and maintain filling texture.
- → Is it necessary to chill the dough before baking?
Chilling the dough firms the butter and prevents shrinkage, resulting in a tender, flaky crust.
- → What are some alternative fruit options for this tart?
Stone fruits like peaches or cherries, as well as mixed berries, can be used in place of strawberries for varied flavors.